Notes from install at Luizom's house
Possible Unbricking procedures
- reflashing a NanoStation M2 with tftp – uses reset button at power up to trigger a tftp reflash. Pumpkin tftp
Notes
- Ubiquiti default username,password = ubnt , ubnt
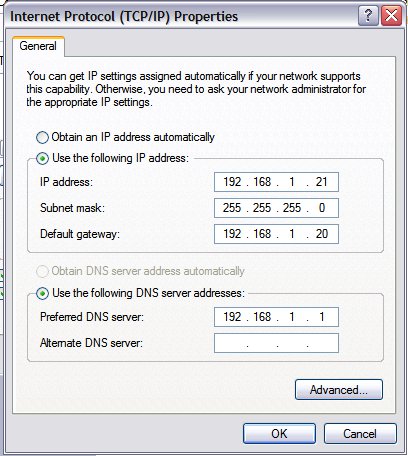
Configuration Files – change the txt extension back to cfg. Security limits of wordpress forced the extension change. Assumes your router IP address= 192.168.1.1 … change that to match your router if different. The tcp/ip settings of the wired local area connection are shown below. These configuration files worked with units that had versions 5.2.1 & 5.3 of AirOs.
Laptop wired local area connection: ( this might have been superceded ! )
Client adapter – { ubiquiti terminology = station }
- Client adapter with fixed IP address of 192.168.1.21 – this connects a laptop directly to my Linksys wireless router / access point via laptop network port to POE unit to Ubiquiti m2 via wireless to router. This works with the standard "Obtain an IP address automatically" settting.
Bridge Pair – { ubiquiti terminology = Access Point WDS , Station WDS }
- { Access Point WDS with DHCP on internet source side } & { Station WDS with fixed IP address on client computer side }
- { Access Point WDS with DHCP on internet source side } & { Station WDS with DHCP IP address on the client computer side } – problem: must hunt around to find what IP address was assigned to the station radio. You will need to dial in to see what signal strengths are when a radio pair is set up! After setting station to DHCP you can set your client computer's TCP / IP setting shown in the above photo to "Obtain an IP address automatically"
Ubiquiti Setup Guides – a little tough to follow because these were documented when the interface was different
Additional Notes

0 Comments